As a mother of a gorgeous, quiet and careful little girl I was always surprised (and alarmed) when I took her to play gyms and she was rudely buffeted about by little boys as if she was just something in the way. The apologies from mums as they ran off after their tornado sons felt as if THEY were the ones who wanted sympathy. "Do something about it!" I would think. "And keep him away from my little girl!"
Then I had a son. And people said things like "Boys will be boys", "Boys are different to girls", and to them I said "No. Not my son. Those are just phrases for parents who have given up. My son will be gorgeous, quiet and careful. He will love his family, and respect others and their feelings". And praises be, that's exactly what he was.
Until about 2 years old.
I should have seen it coming when he fell in love with dinosaurs. His roaring is second to none and he can stomp with terrifying force for someone so skinny. Next it was "Superman!" (which applies to any superhero incidentally) and flying around the room, punching furniture and leaping off sofas.
At this stage I had caught on to what was happening and was trying to reverse it - while still enjoying the sight of my son flowering into a little personality. But no amount of puzzles or books would stop him from raging through the house leaving only devastation. More than once he has made his older sister cry with his power punches and WWF-style tackles. Where did he learn all of this?
I. Do. Not. Know.
He doesn't go to nursery and doesn't have many friends his age. I - now - honestly think it bubbles out of them naturally and then all you give them is a word to pin it to like "Dinosaur roar" or "Superman" and it's chaos from there.
I can't reign him in, he is just too fast. When I tell him off he smiles like he doesn't understand why we are slowing the game down. When he bumps over your daughter at the play gym I am so embarrassed and sorry, believe me! Pity me as I chase after him! And forgive me if I don't bring him back to apologise but I have to have a hierarchy of pain or he would be apologising all day long.
BUT you should also know this: for every parent whose son is a superhero, prehistoric beast or just a little fireball of energy, we are embarrassed when that personality causes you or your little ones any discomfort; but above that we are so, very, very proud.
Not proud for hurting anyone - god forbid. Proud because our child is confident and wild at heart. Proud that he doesn't think about consequences before he jumps because he knows jumping itself is such fun. That he seeks adventure and fun, and energy is spinning in him like a nuclear-powered gyroscope. He's strong and he is super and he is ready for anything and to try anything. He'll make a mess and he'll break some things just to see what it's like. He thinks everything is his even if this is the first time he has seen it, he will protect it until it suits him to share. So proud.
Now I am not defending the actively mean kids. You know the kid who take pleasure in other people's pain, but I don't have one of those, so I can't comment, but I am sure their parents have a story too.
I also am not saying that girls can't be this crazy-wild or boys can't be quiet and calm; that is not the point at all.
The point is: I love my children both quiet and wild, I cannot shape them, I can only try to steer them safely along the path of right and wrong. If I could make them do exactly as I wished I would have two exact copies of me in the world, and god knows I have enough personality flaws to sink a ship, so who would want that??
Keep them safe and set them free.
Except in a store. For that I am truly sorry. That's like a church. No proud feelings there. Truly, truly sorry.
But aside from stores and churches - Woohoo!
Thursday, 7 November 2013
Tuesday, 6 August 2013
Home-Made Moon Sand - Sensory play for young children
This was brought to my attention by a Pinterest Pin which unfortunately had no real website behind it but all the instructions we needed were in the pin description.
Not deterred by a lack of actual facts we gave it a go with some really fun results!
You will need:

Method:
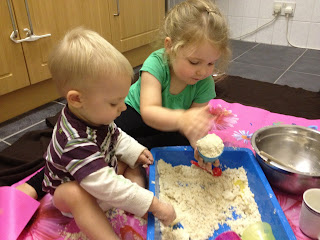 Due to the consistency of the moon sand the kids could play with it as though it were fine sea sand and build sand castles out of it. They patted it flat, drew pictures in it, stacked sculptures high and knocked them down.
A wonderful sensory play session and I know they didn't want it to end.
Some Crafty Kids think Home-Made Moon Sand is:
Fun: 8/10
Educational: 6/10
Show & Tell-worthy: 7/10
Not deterred by a lack of actual facts we gave it a go with some really fun results!
You will need:
- 4 cups of flour
- 1/2 cup of baby oil
- Bowl for mixing
- Flat container with sides for playing (we used our trusty never-been-used cat litter tray) eg. a large roasting tin or plastic crate
- Spoon for mixing, although you could just use your hands
- Small cups, pots, spoons, cookie cutters, shapes, and ANYTHING you feel like playing with. Whatever you use will need to be washable so you can clean it afterward.
- Protective sheet you can just shake or vacuum all that flour off afterward.

Method:
- Put the ingredients in the bowl and mix until the oil is evenly distributed. The moon sand will feel soft and surprisingly dry and powdery as well as compactable.
- Let the kids get their hands in and play.

 |
| Stack them up |
 |
| And knock them down |
A wonderful sensory play session and I know they didn't want it to end.
Some Crafty Kids think Home-Made Moon Sand is:
Fun: 8/10
Educational: 6/10
Show & Tell-worthy: 7/10
Saturday, 3 August 2013
Leaf Painting and Big Art Project - Easy Autumn Craft for Kids of all Ages
This was a great craft which took up most of an afternoon.
Step 1: Find some leaves
You will need: A bag/packet for the leaves which may be damp
We took a walk around our neighbourhood and raided all the gorgeous fallen Autumn leaves along the roadsides. Even under a single tree you will find big and small leaves, different types, colours and textures. It's fun to let the kids be picky about what they choose for their bag.
 |
| Leaf hunting |

Step 2: Painting
You will need:
- White A4 paper
- Coloured liquid paint. We used Crayola washable kids paint
so my toddler could have a fun too without causing any damage.
- Protective painting sheet: If you are only aiming to do the small page leaf prints then a regular painting protective sheet will be perfect.
- For the larger painting project having something you can paint on from the start is ideal. A large sheet of paper will do well or in our case an old disposable table cloth.
Leaf Impressions: How to do it:
- For a detailed impression paint the underside of your leaf where all the veins are more visible. For a solid leaf shape, paint the topside.
 |
- Now press it down and rub all over to be sure to get as much contact with the paper as you can.

- Time for the great reveal! Peel that leaf off the page but try not to drag it or it will smudge.
- Now do some more! Use different leaves and different colours if you like.
 |
| Pretty! |


 |
| A finished picture. A little bit of Autumn to frame. |
 |
| This is why we use non-toxic washable paint! |
Big Art Project: How to do it:
Once we had finished a few leaf paintings we noticed the disposable table cloth we were using looked quite arty itself and since we were going to throw it away anyway... Why not paint it! (Clever Daughter's idea obviously).
So I stood back and let them loose.
 |
| That's my hand! |
 |
| That looks like trouble! |
 |
| Needs purple! |
 |
| DinoKid was happy to give it a go. |
 |
| Just like this! |
 |
| Fast learner. |
 |
| Use your feet! |
 |
| The finished mat. |
You are going to need to take a photograph of that final artwork. It's beautiful and personal and messy and awesome and full of fun.
Now throw those kids in the bath!
Some Crafty Kids think Leaf Painting and Big Art are:
Fun: 10/10
Educational: 9/10
Show & Tell-worthy: 10/10
Friday, 2 August 2013
Goop (Cornflour + Water = Fun!)
This was one of our very first Show and Tell Weekend Projects. I found the link for some awesome Goop projects here.
You will need:
Method:
Goop is amazing because when it is left it relaxes into an almost liquid state, you can pour it, swirl it and tip it from side to side, but when it is squashed, compressed or even hit it becomes immediately rock solid. (find the science behind it here).
What all that means is that kids can really get their hands into something completely mind boggling, messy (and yet not difficult to clean up!), non-toxic (it's completely edible even if tastes disgusting) and magical!
My son was 1 year and 2 months old and had almost as much fun as his 4 year old sister did. FINALLY someone let him play with spoons of liquid and pour stuff on himself without fretting. Bliss.
A quick video of the pressured vs liquid state:

We used a number of different kitchen utensils to scrape, scoop, smack and stir.
 When it's stringy like this it always reminds me of the "Blue Goo" from Dr Seuss' "Fox in Socks":
Eventually after what must have been an hour of playing we realised the water in our cornflour had almost all evaporated, probably assisted by the children's body heat and constant movement. I am sure you could add more water and start again, but I took it as our cue to bring the experiment to a close.

This return to a powdery form is also why goop is so easy to clean up. Once we were all finished I went over the room with a vacuum first and then wiped the rest away with a wet kitchen towel. Rinse and repeat.
Honestly, writing this blog makes me want to do it all over again tomorrow! What a blast. Clever Daughter actually said how lucky it was that it had rained and we had to stay home, because it was the best fun EVER.
This is a little video of our fun:
Some Crafty Kids think Gloop is:
Fun: 10/10
Educational: 10/10
Show & Tell-worthy: 10/10
You will need:
- 1 x 500g packet of Cornflour
- About 1.5 cups of water
- 1 large roasting tin, plastic tub or similar (we used a never-been-used cat litter tray)
Method:
- Add the water to the cornflour slowly while mixing (which is so hard considering mixing cornflour is like mixing broken tiles), until you have a sort of custardy mix. If it does become too liquid, you will need to add more cornflour or just play with it for a while and the liquid will evaporate eventually. I have even put mine under a fan for 20 minutes when I overwatered once and it evaporated really well.
- Have the best time!
 |
| No pressure = Runny goo |
Goop is amazing because when it is left it relaxes into an almost liquid state, you can pour it, swirl it and tip it from side to side, but when it is squashed, compressed or even hit it becomes immediately rock solid. (find the science behind it here).
What all that means is that kids can really get their hands into something completely mind boggling, messy (and yet not difficult to clean up!), non-toxic (it's completely edible even if tastes disgusting) and magical!
My son was 1 year and 2 months old and had almost as much fun as his 4 year old sister did. FINALLY someone let him play with spoons of liquid and pour stuff on himself without fretting. Bliss.
 |
| Pressure = Hard ball! |

We used a number of different kitchen utensils to scrape, scoop, smack and stir.
 |
The clothes peg is a surprise success!
|

 |
| Yep, that's the stuff. |
Eventually after what must have been an hour of playing we realised the water in our cornflour had almost all evaporated, probably assisted by the children's body heat and constant movement. I am sure you could add more water and start again, but I took it as our cue to bring the experiment to a close.

This return to a powdery form is also why goop is so easy to clean up. Once we were all finished I went over the room with a vacuum first and then wiped the rest away with a wet kitchen towel. Rinse and repeat.
Honestly, writing this blog makes me want to do it all over again tomorrow! What a blast. Clever Daughter actually said how lucky it was that it had rained and we had to stay home, because it was the best fun EVER.
This is a little video of our fun:
Some Crafty Kids think Gloop is:
Fun: 10/10
Educational: 10/10
Show & Tell-worthy: 10/10
Wednesday, 31 July 2013
Experimenting with Water Absorbing Crystals (The powder inside nappies!) for Home-made Fake Snow
This was a very cool experiment. I had found a Pinterest Pin a few months before which lead here and I think I forgot the bit about it not actually being the powder from inside nappies. So when we did it, ours went a little something like this:
Home-Made Fake Snow

1. Get about 3 or 4 baby nappies you won't need and prepare to shred them.

2. Tear the inner lining of the nappy rather forcefully (or cut with scissors!) You will be met by many layers of cotton wool, but what we want is the grains of powdery crystals which will immediately start to come out. We found shaking and patting the nappy over a large bowl got quite a good yield of crystal powder. This powder is the hydrogel or water absorbing crystals which usually soak up all of baby's... wetness.
3. Cotton wool will also fall into the bowl, just pick out the worst bits, give the bowl a good swirl around and the crystals will sink to the bottom and you can try to pick out the rest of the wool. If some remains it will not affect the outcome.
4. Now to add water. We started out with a 1ml dropper

But after 13 drops the gel was still sucking up the water and the kids were getting impatient and looking forward to playing with it!

So we started again:


Jenny was amazed as we realised it has changed from a liquid state to a solid.

The salt transforms the "snow" back into a liquid!
So I thought I would do one last change up with this fabulous stuff, threw a random amount in a baby food jar with some blue food colouring. Closed the lid and shook it up.

Like an iceberg sucking up the sea...

The kids had a great afternoon, and it was definitely worth the nappy sacrifices.
Home-Made Fake Snow

1. Get about 3 or 4 baby nappies you won't need and prepare to shred them.

2. Tear the inner lining of the nappy rather forcefully (or cut with scissors!) You will be met by many layers of cotton wool, but what we want is the grains of powdery crystals which will immediately start to come out. We found shaking and patting the nappy over a large bowl got quite a good yield of crystal powder. This powder is the hydrogel or water absorbing crystals which usually soak up all of baby's... wetness.
3. Cotton wool will also fall into the bowl, just pick out the worst bits, give the bowl a good swirl around and the crystals will sink to the bottom and you can try to pick out the rest of the wool. If some remains it will not affect the outcome.
 |
| Our collection taken from 4 nappies. |
4. Now to add water. We started out with a 1ml dropper

But after 13 drops the gel was still sucking up the water and the kids were getting impatient and looking forward to playing with it!

- 90mls water + 1 teaspoon powder.

- Wait a little bit and watch those little crystals sucking up all that water.

Jenny was amazed as we realised it has changed from a liquid state to a solid.

- This is how much "snow" we got from one teaspoon of powder and it would have gone further if we had given it the water and some time.
 |
It is completely safe to handle and hold. But I would say don't eat it. |
Play time! Spoons, bowls and bare hands squashed, scooped, sprinkled and squeezed away about 30 minutes of focussed (semi-messy) fun.
 |
| The crystals have a lovely soft texture. |
 |
| You just can't squeeze the water out of there. |
Then Clever Daughter looked around the kitchen and said "What happens if we add salt?" Now I must say that I think she said this because she isn't allowed to play with the salt shaker and thought this might be her chance. But I thought Salt Does Do Weird Things To Water, Let's try!
 |
| Yippeee! Happy to add some salt. |
 |
| Left: No Salt; Right: Salt Added. |

Like an iceberg sucking up the sea...

Some Crafty Kids give Home-made Fake Snow:
Fun: 8/10
Educational: 9/10
Show & Tell-worthiness: 7/10
Tuesday, 12 February 2013
Rocking Out in Show and Tell

So when my Clever Daughter started Reception and they said she had to do a Show and Tell presentation every Monday I thought it was an opportunity to really get her used to speaking in front of a group from a young age.
What we all do for Show and Tell is send our child in with a toy and say "Tell them about it" then wheelspin it out of there reassuring ourselves that it doesn't really matter anyway.
If I said to you "Tell me about your teacup?" You COULD launch into a very interesting speech about where it came from, how it was made and the labour costs vs the store price, but you will probably say something like "I got it on Mothers Day 3 years ago. It came with a small bear too."
My point is that it's not easy to have much to say about an object even for an adult. A child has a lot less to say usually. You may have tried to pry information out a child before, "Where did you get that screwdriver from?" "How did you get your pasta on TOP of the TV?" but they can be quite cagey when they aren't sure of details.
So began the Show and Tell Weekend Project.
Every weekend we do one interesting thing together and I take photos. Usually these projects are ideas from Pinterest, sometimes science sites sometimes we just ice cupcakes. Then on a Sunday evening I put the best of those photos onto an A4 or two, and Clever Daughter takes them to class AND KNOCKS THEIR SOCKS OFF.
At least that's what I am picturing.
But my visions are not unfounded, if a little overzealous: the teacher keeps telling me how they look forward to Jenny's Show and Tell presentations, and that she can talk for quite a while, referring to the photos and remembering the information as she goes. She also answers questions at the end with intelligence and accuracy.
That's my girl.
She's 4, turning 5 in a month, and she's preparing to be Awesome in the big bad world right now.
So it's all worthwhile, you see? Invest in your children's education and with faith, trust and pixie dust they'll find their way.
Subscribe to:
Comments (Atom)